Preparing for a Large Project

Waterfall Color Studies

The more preparation a person does before a big project, the greater confidence one has in what might happen when the color hits the ground.

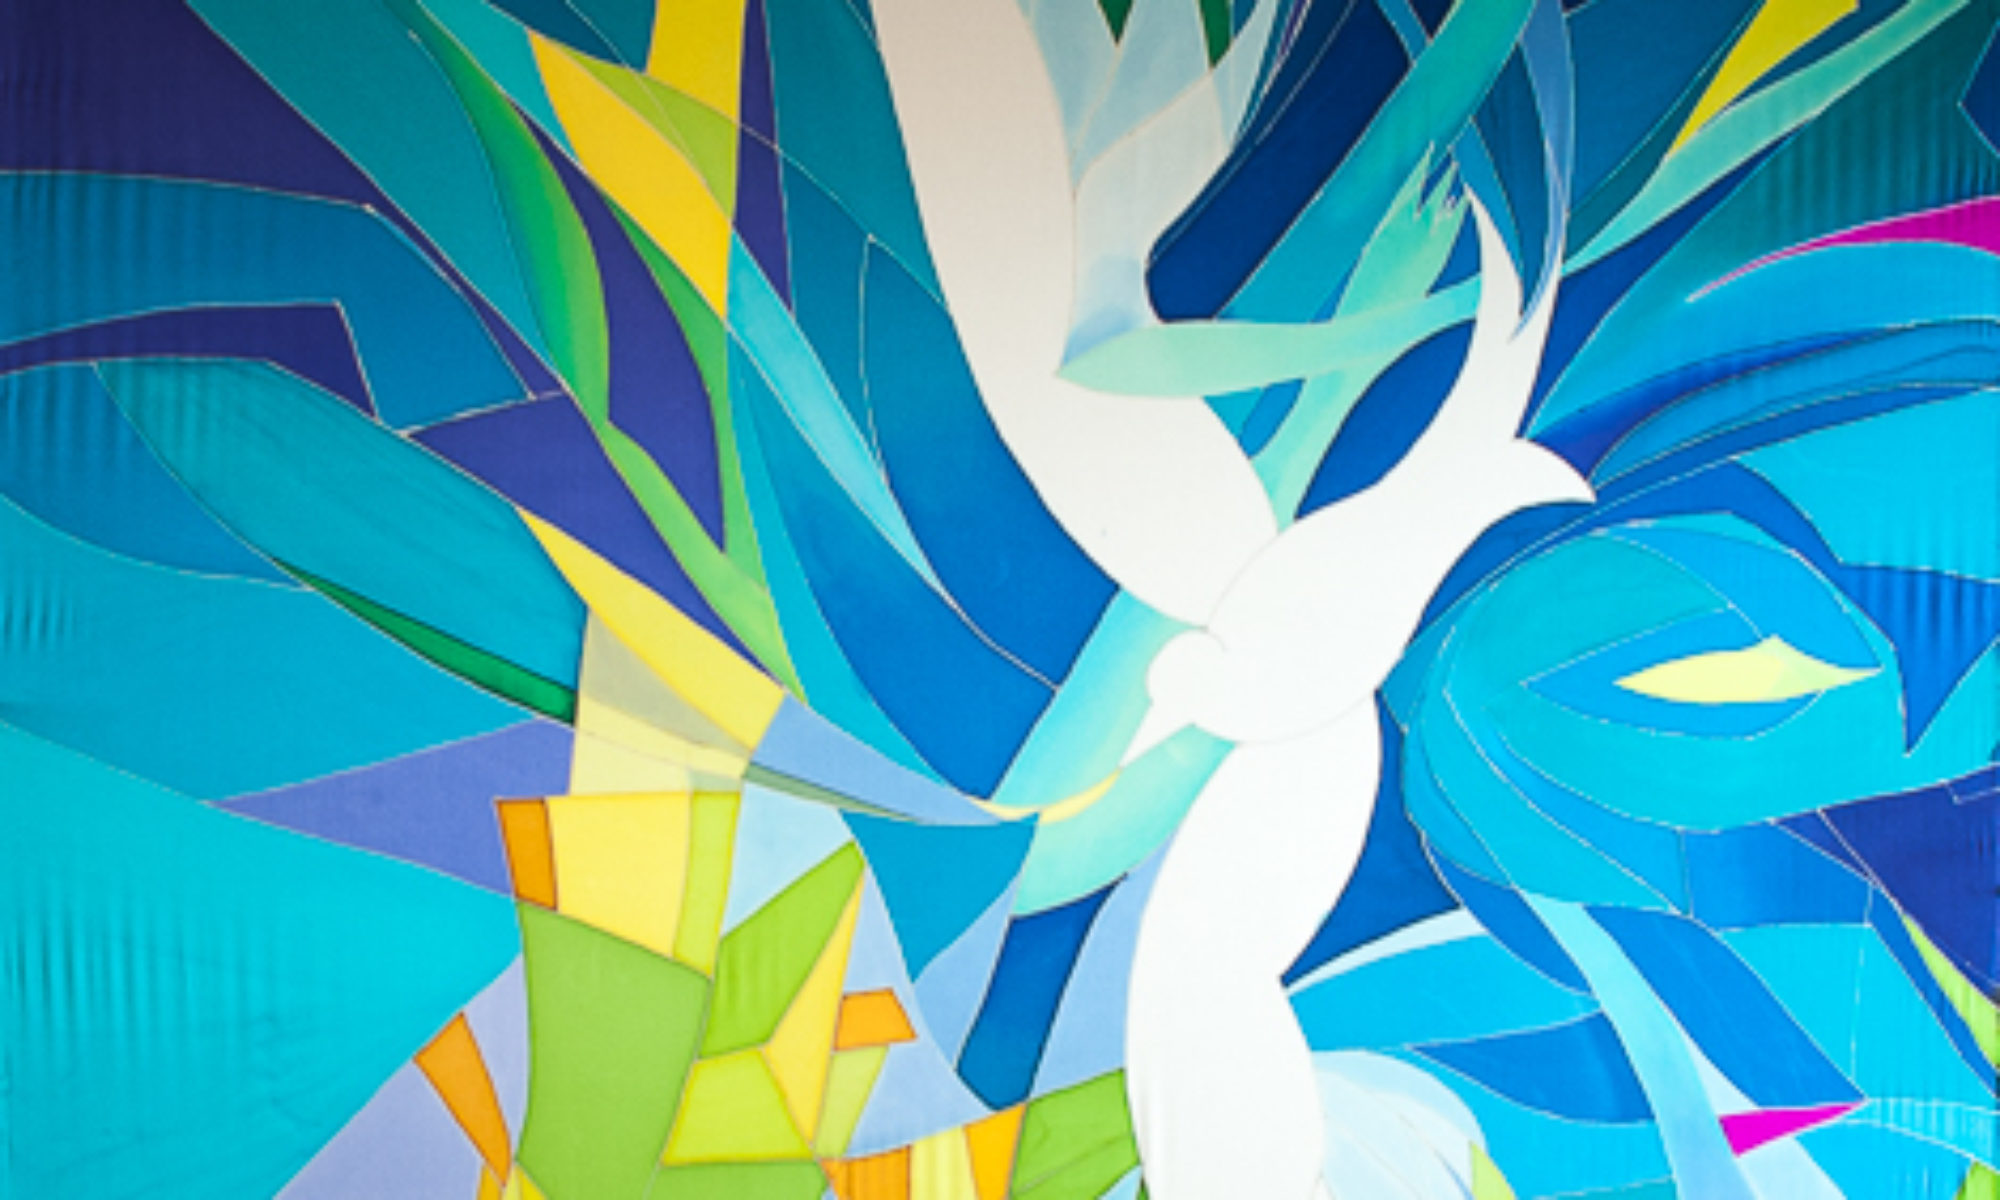
This project will be 36 feet by 8 feet, silk dye on silk, of a waterfall. The design is monochromatic, that is, mostly blues and very little else, so I will have to depend to a great degree on value (lightness and darkness) to carry the piece. I also ordered some new colors of  dye, so I had plenty of nice rich blues to work with.

©2013 Kristen Gilje color studies for Waterfall

Since I ordered new blue dyes that I’ve never used before I wanted to see how they react with the dyes I already have, so I made a new color chart that includes the new dyes. Now I know what a color mixed with any other  dye will look like. On the right you can see the watercolor pigments I used to make the watercolor sketch I am using for the silk painting. It is these colors I wanted to find equivalent dyes for.

©2013 Kristen Gilje color studies for Waterfall

Above is the watercolor sketch of the waterfall, turned on its side. Look carefully to see the gridding on the sketch. Each line represents one foot. The waterfall will be 36 feet long, in three pieces: one 4 feet wide, and two 2 feet wide. You can see the long pen lines marking where the sketch is divided into 3 parts, wider in the middle and narrow on each side. Hanging below the sketch is my chosen palette! The color scheme is simple, with blues from light to dark, and from greenish to more purple-ish. Then I added in the complement of blue, orange, in an earthy tone, both lighter and darker. And also a black to punch up the value, if needed.

Kristen Gilje Zion's Waterfall2 wc sketch

Here above is the waterfall sketch, with a grid on tracing paper that I can lay over the sketch. It is carefully drawn to size, so I know how wide each panel will be, where the beam in the ceiling will intersect with the silk, and how high the 12′ slit in the bottom will be on the design. Why the slit? To pull back each side like curtains to reveal an immersion baptismal pool!

©2013 Kristen Gilje silk on frames for waterfall

My husband made me these wonderful frames to stretch the silk on for painting. You can see two narrower 2′ wide frames and one 4′ frame in the center, with silk stretched on them. He made rollers on each end of the frames, so I can work on just 9 feet of the 36-foot length of silk at once. I marked each foot of each piece of silk, so I can paint them side by side, knowing I’m in the right area.

Also note my wonderful studio, which is being built on weekends. Soon there will be an arched window overlooking the bay, and an opening skylight. We put in a floor and a staircase to get to the attic last fall, insulated this spring, and this coming fall we will put up dry wall and paint the walls white. The distance from the floor to the peak is 11 feet! It’s a wonderful place to work.

Keep an eye on this blog. I’ll be taking you through this whole process as it progresses. Also see the previous entries to get the full story on this project!


Waterfall Update: River Theme for a Northwest Church

A few weeks ago I introduced you to a current project and promised to keep you in the loop as it develops (see earlier post).  The theme for this project is a vision from Ezekiel 47 (and repeated in Revelation 22), of the river of the water of life, flowing from the throne of God, bringing healing, wholeness and life to all. We are starting with a 30 foot long painting of a waterfall.

©2013 Kristen Gilje Zion's Waterfall small sketch for silk painting 30 feet by 8 feetThis is a congregation of immersion baptism, and a baptismal pool will be behind this waterfall. !!!  For a baptism, the lower 12 feet of the banner will be drawn to each side, like curtains, to expose the pool and the drama of the baptism.

I like how the vertical water, flowing from the throne of God, is powerful and mysterious. This congregation has pushed me into a more abstract interpretation of “waterfall”…my painting tends towards realism when I work with landscape. As you can see below and to the right, which is my first attempt at the design.

©2013 Kristen Gilje, Zion's Waterfall wc sketch

When I brought this first and more realistic design into the sanctuary and we imagined it 30 feet tall it became readily apparent that the image would be overpowering. It’s a nice little sketch, but that white cone of a waterfall is just too strong, and too literal. “No scope for the imagination” as Ann of Green Gables would say. Just like a good poem, you don’t want to say it all, but instead leave room for the text to work, for instance, or the Spirit.

My clients, a pastor and a worship leader, asked for more abstraction, so I went home and tried my hand at it. I actually did about 6 of these, trying to make it work. But they all ended up pretty wimpy looking.

©2013 Kristen Gilje River Banners WC sketch
Sound panel sketch, 3rd down from the top in the waterfall. Can you find it there?

In the end, not happy with any of the second batch, I went back to a sketch originally for the 26 sound panels that are to be covered with silk also (more on this later). I put those together and turned them vertically.  It worked! Powerful, majestic and magical, in my humble estimation.

This original design simply “came” to me, for the sound panels. If you look back at the first picture, you can see the waterfall is made up of several horizontal pieces of paper. The one shown to the left here is the 3rd panel from the top, in the waterfall. Can you find it? Each of these pieces is to potentially be a covering for the 26 sound panels, 8′ x 4′ each, that surround the walls of the sanctuary. We shall see if the project continues into this chapter. For now, it’s enough to make this big waterfall!

In the next days I’ll post pictures of what it looks like in my studio when I actually  start making these. As you can see, there’s a lot of planning that goes into the design process. It’s actually the hardest, and most important, step of the whole process.

Here’s the Ezekiel 47 text:

“Then he brought me back to the door of the temple, and behold, water was issuing from below the threshold of the temple toward the east (for the temple faced east). The water was flowing down from below the south end of the threshold of the temple, south of the altar. 2 Then he brought me out by way of the north gate and led me around on the outside to the outer gate that faces toward the east; and behold, the water was trickling out on the south side.


3 Going on eastward with a measuring line in his hand, the man measured a thousand cubits,[a] and then led me through the water, and it was ankle-deep. 4 Again he measured a thousand, and led me through the water, and it was knee-deep. Again he measured a thousand, and led me through the water, and it was waist-deep. 5 Again he measured a thousand, and it was a river that I could not pass through, for the water had risen. It was deep enough to swim in, a river that could not be passed through. 6 And he said to me, “Son of man, have you seen this?”


Then he led me back to the bank of the river. 7 As I went back, I saw on the bank of the river very many trees on the one side and on the other. 8 And he said to me, “This water flows toward the eastern region and goes down into the Arabah, and enters the sea;[b] when the water flows into the sea, the water will become fresh.[c] 9 And wherever the river goes,[d] every living creature that swarms will live, and there will be very many fish. For this water goes there, that the waters of the sea[e] may become fresh; so everything will live where the river goes. 10 Fishermen will stand beside the sea. From Engedi to Eneglaim it will be a place for the spreading of nets. Its fish will be of very many kinds, like the fish of the Great Sea.[f] 11 But its swamps and marshes will not become fresh; they are to be left for salt. 12 And on the banks, on both sides of the river, there will grow all kinds of trees for food. Their leaves will not wither, nor their fruit fail, but they will bear fresh fruit every month, because the water for them flows from the sanctuary. Their fruit will be for food, and their leaves for healing.”

Isn’t that an awesome picture of the church?  That the Spirit and Word of the Lord flows from the throne and gets deeper, providing sustenance and healing to all! ”


Designing a Silk Banner from Two Logos: Proclaim ELM

Kristen Gilje working on Proclaim ELM detail

Extraordinary Lutheran Ministries director Amalia Vagts commissioned a set of banners that can travel to different congregations. ELM has developed a logo for their organization and a logo for a program contained within ELM, called “Proclaim”.  My job was to combine those two logos into one design for one banner, and to create a second companion banner out of the “ELM” logo alone.

Kristen Gilje working on Proclaim ELM detail

Here are the two logos I combined:


ELM logo
ELM logo
Proclaim Logo
Proclaim Logo


On the left  is how I chose to combine the two logos into one:

Proclaim ELM watercolor sketch
ELM watercolor sketch

and here on the right is the companion banner.During the designing process Amalia and I were in contact so I could have her input and feedback, and incorporate any changes required.

Once we agreed upon the design the next step was to transfer it to the silk. Instead of drawing on the silk I drew the design on a large piece of paper the same size the banner was to be. I did this our the attic, which is my future studio!

Kristen Gilje drawing Proclaim ELM design
Kristen drawing Proclaim ELM design in her studio-to-be

As I write this my husband Kristofer is framing in skylights and a picture window (facing north) and getting ready to insulate the attic space. This will make a wonderful studio, and it’s hard to keep from moving in before it’s finished!

After drawing the design as big as the banner I stretched silk onto a wooden frame, then put the drawing under the silk. I could see the lines of the design through the silk, and copied these lines onto the silk with a resist.

Kristen Gilje applying wax to lettering
Kristen applying wax to lettering after lines of design are transferred, working in the dining room of our old house (that’s another story)

Now it’s time to put some color on the banner! I usually start with the lightest colors first, then move to the darker ones. The biggest challenge with this painting was to keep any dye out of the area to remain white.

Kristen Gilje Proclaim ELM in progress
Starting to paint the image

And the following picture is of the completed painting. Next: the silk painting must be steamed to set the dye, and then I’ll cut the bottom to create and inverted arch shape. The last step is to hem the banner and add a sleeve at the top. There’s quite a lot of work to do after all the painting is completed, but at least you can see what the banner is becoming.

Below you will see that the wax is still on the lettering. The wax will burn off in the steaming process, and will look much whiter. I’ve cracked the wax in the lettering to let some of the blue dye into the letters. This is similar to a batik effect, and ties the lettering visually into the piece. Otherwise the lettering looks like it’s not truly a part of the piece.

©2012 Kristen Gilje, Proclaim ELM, handpainted silk 96"x45"
©2012 Kristen Gilje, Proclaim ELM, handpainted silk 96″x45″

After I remove this one from its wooden frame to go into the steamer I’ll stretch a fresh sheet of silk over it to start the companion ELM banner. I’ll post that one for you to see when it’s ready.

New Red Banners for Schaeffer-Ashmead Chapel


Painting in the living room

I’m honored to be making another set of banners for Lutheran Theological Seminary at Philadelphia this year. The graduating class of 2012, LTSP, has chosen to commission a pair of banners to continue the set ordered last year by the class of 2011.

Last year’s banners were also in pairs: Green, purple, and gold/white. You can see two of them in the picture below.

Philadelphia-2
Two of 3 pairs of banners from last year’s gift hanging in Schaeffer-Ashmead Chapel at LTSP

Here’s a peek into the process:

 I start with white silk pinned to a wooden frame the size of the banner, which my husband has made.  This frame is 16 feet long and 45 inches wide. We set it up in the living room and adjacent shop area, after moving all the furniture away.

First I experiment with the colors I’d like to use, see how they mix together. Then I mix up a batch big enough to cover all the silk.

I use techniques similar to watercolor painting when I do these nice loose silk paintings. The silk is made damp first, so that the dyes will move and blend into each other softly. Then I apply the dye with sponge brushes.  

LTSP Red Banner in Progress
Detail First Red Banner: this process is very much like watercolor, only on a large scale
Dry silk banner ready to be rolled in paper

After the silk is completely dry, usually over night, I remove it from the frame, lay it over newsprint paper, and roll it up in the paper.

Here you can see the whole first red banner, with paper underneath, extending from the living room into our shop.

Next I roll the silk and paper up together, drill a hole into the top of the roll (avoiding the silk of course), and stick it into a piece of stove pipe.


Steamer for “fixing’ the dyes

The silk roll then hangs vertically down in the center of the stove pipe. I top the pipe off with newspaper and a towel as a lid.

I carry the stove pipe outside and put it into a big pot full of water, with a propane burner underneath. After sealing the pot to the stove pipe with aluminum foil and masking tape I light the fire. The water boils, making steam. The moist heat chemically bonds the dyes to the silk.

The silk steams for 4 hours. After letting it cool for a while I bring the pipe back into the house and unroll the silk. Usually the colors are brighter after they are steamed, so it’s always a pleasure to see what’s inside. Very much like opening a potter’s kiln, to see what the new pots look like!

For these banners, I cut the bottoms into an inverted arch, to match the arches in their new home. Then  the hems are hand-stitched, so I can control the tension of the thread. This way they hang better.

All that’s left now is to finish the hemming, pack them into cardboard tubes, and send them off!