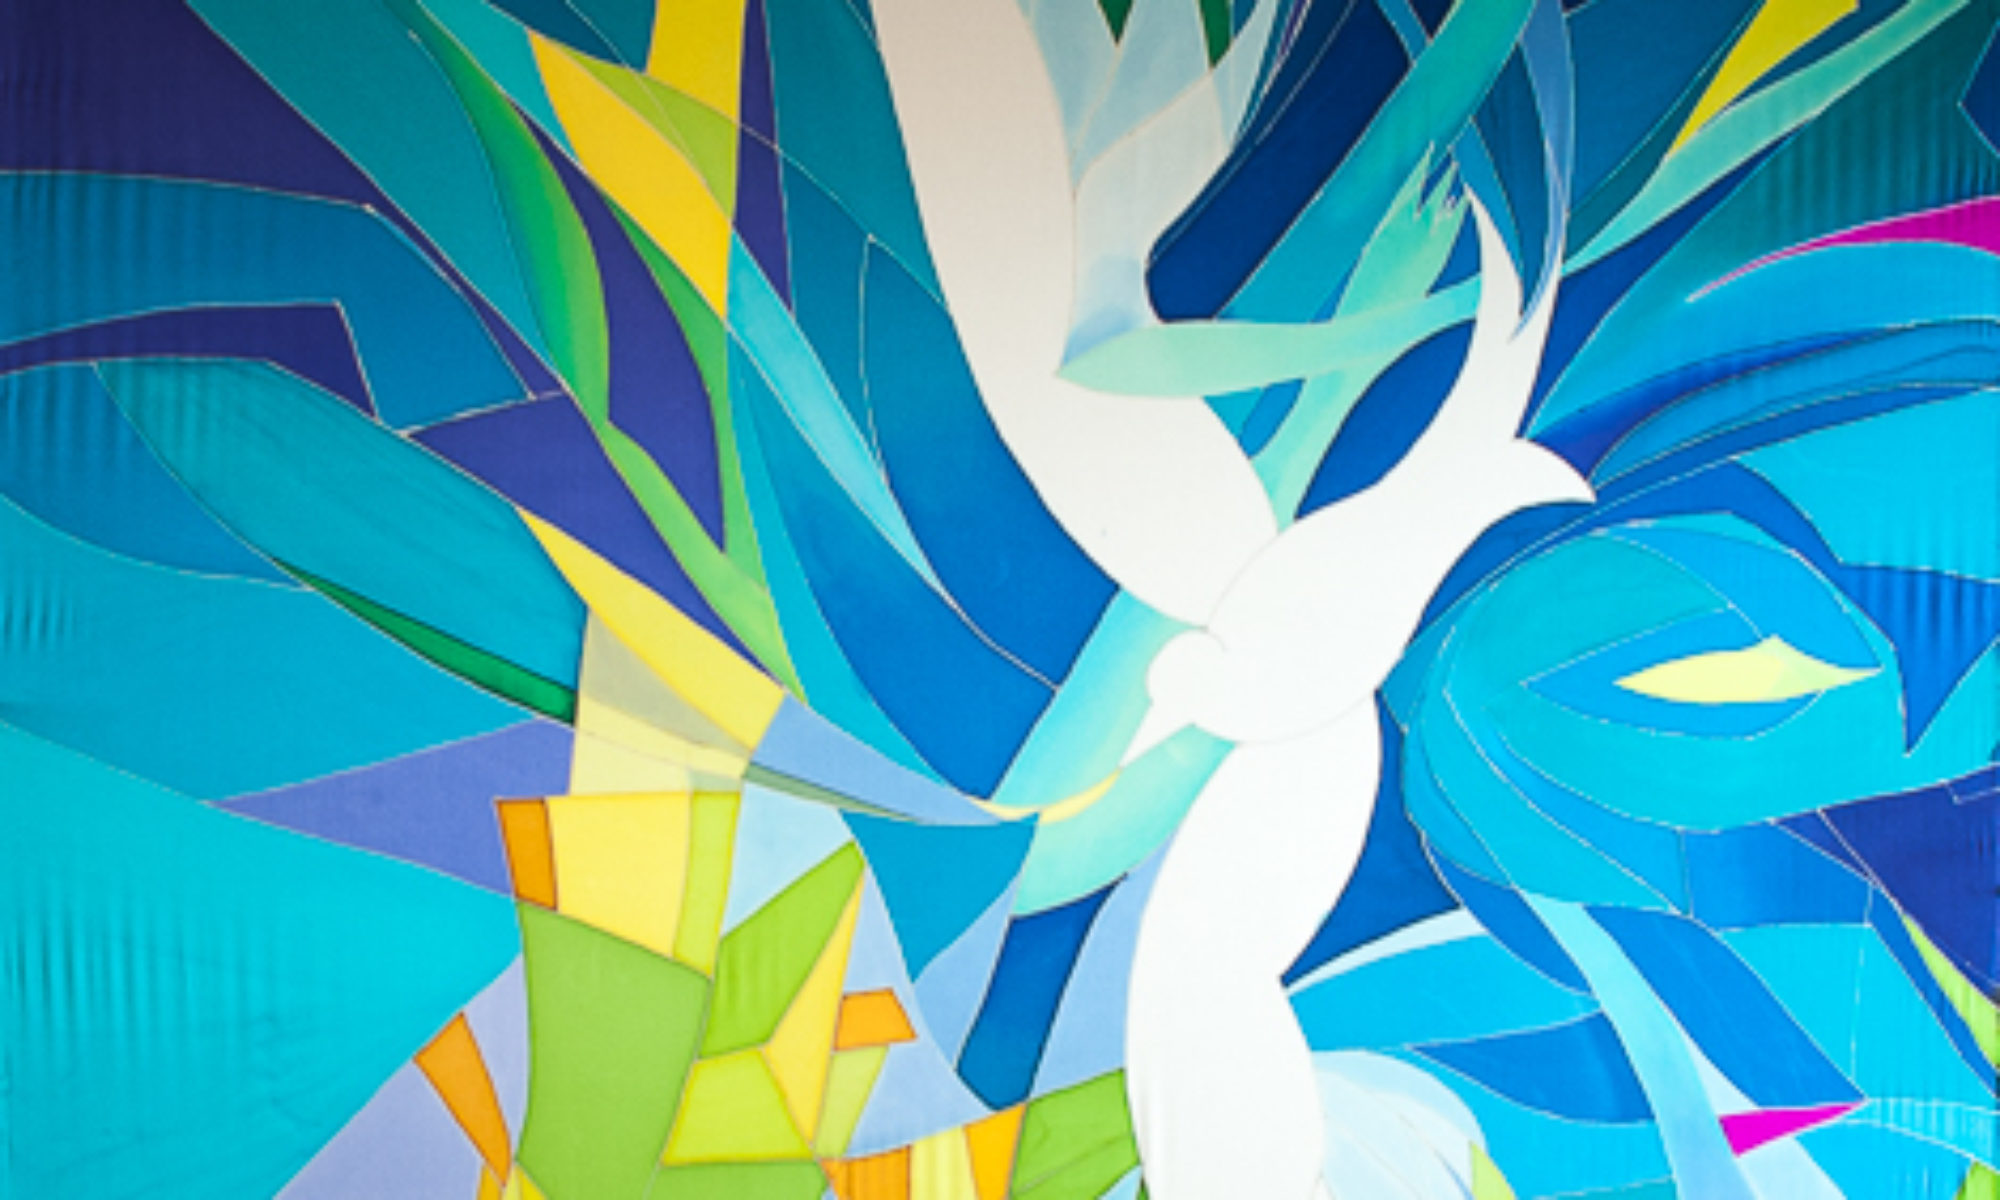
This large 3-panel banner which I call a silk mural, was hung this winter, and really makes a presence as you walk into the sanctuary. It is 36 feet long and 8 feet wide. My task was to design “an abstract waterfall”, leaving room for interpretation.
The wall behind and around this silk mural was painted a medium dark brown to echo some of the rock colors, and to help enhance their videos. Apparently darker colors are better than light ones for this.
This church pushed me in a very positive way, from my comfort level of more representational art to more abstract work. I chose a very limited pallet of blues, with a bit of the complementary dark orange/browns, used value (lights and darks) to drive the design, and really let the silk dye do the work itself instead of controlling it with a lot of detail.
Originally the mural was designed so the cross would hang two-thirds of the way up the banner. This would be on the lower part of the dark stream coming down from the top, and above the white waterfall streams that are hitting the rocks. I hope someday they will do this, but we’ll see. When an artist makes a piece it’s a bit like bringing a child into the world: you have to let go when they leave home.
If you would like to follow the process of designing and making this project, scroll down to see 4 or 5 earlier posts about Zion’s Waterfall. You can see the project morphed quite a bit, before we settled on a final design.
It’s been a very busy summer, but the 36 foot by 8 foot abstract waterfall project is just about finished. This weekend I took the 3 silk panels back to the school gym floor and unrolled them to check finished size and appearance. I am very pleased with the final layers of dye, and think that the goal of a sense of “power” and “mystery” translates very well. I measured everything, and with cutting, rolling, painting, washing, steaming and shrinkage, the panels are very very close to the desired size. The center panel is one inch longer than the other two (difference in shrinkage), and when the panels are side by side with no gap they measure 8 feet by 6 inches exactly, top and bottom, which is what we were shooting for.
The picture below shows the scale of this project, when you see the piano in the upper right hand corner.
I have hemmed the 216 feet of the side edges of the panels, and am about to make the 12 foot slit in the center panel so it can open for the immersion baptismal pool behind the panels. Then I’ll take the 4’x 15″ rectangle out of the top middle of the center panel to make room for the beam in the ceiling, then hem both of those.
Also, all the tops of the silk panels will have sleeves for a rod, to be hung either from the wall or from the underside of the beam. I will lastly put sleeves in the bottom of all the panels in casewe want to run a rod through those too, for stabilizing.
To see full pictures, click on one of the thumbnails below.
Using stovepipe and propane burners to steam-set silk dyes
Once the silk dye has been applied to the silk, the dyes need to be steam-set to bond permanently with the fabric. Before steaming water can wash most of the dye from the silk, but after steaming water will not hurt the silk painting. The painting becomes permanent. (Except for direct sunlight! In direct sunlight the silk painting will fade. Indirect sunlight is fine.)
Here you can see the set-up I use to steam my silk. I am steaming “Zion’s Waterfall”, which consists of three silk panels: two are 37 feet by 28 inches, and one is 37 feet by 52 inches. The widest panel is being steamed in the tallest stovepipe, and one of the narrower panels is in the shorter stovepipe.
You can see the silk painting in different stages in earlier posts by clicking on the following:
To steam the silk it is first rolled up in newsprint and brown wrapping paper, making sure there is room on the top of the roll to drill a hole through the top inch. I stick this paper/silk roll inside the stovepipe, then thread a wire through holes in the top of the stovepipe and the drilled hole through the paper roll. Now the stovepipe can be upended, with the paper roll hanging from the wire inside the stovepipe.
Next I stick the whole affair into a hotel-sized pot on a propane burner, fill the pot with water, seal the space between pot and pipe with aluminum foil crimped under the rim of the pot and taped with masking tape to the pipe, so there are no holes for steam to escape. I light the burner, and let the water boil and make steam for 3-5 hours, depending on how thick my roll is. Oh yes, the lid on top of the pipe is 1-2 inches of New York Times papers, procured from local co-op’s recycle bin, secured with masking tape to the top of stovepipe. Somehow it all works! I can tell if the steaming is successful in two ways: that the colors are more intense than before steaming, and when hand-washing (next step after steaming) that clouds of excess dye do not wash out of the silk, but just a little bit of dye that is not bonded to the silk.
If you want to do this process yourself there are more details to know for success. For now I can suggest Susan Louise Moyer’s book “Silk Painting” where you will find complete directions. I’ll write complete instructions later this summer for those interested.
Working on a project that is 36 feet long when you only see 9 feet at a time can be tricky. I’m working on 3 wooden frames that have rollers on each end, so when I’m done with the first 9 feet I roll the fabric down to the next 9 feet.
Today I got a chance to roll it all out, all three panels side by side, on a big floor at a school so I can see it all at once. This is the only way to check on how it’s going and what changes still need to be made.
Zion’s Waterfall, 36 feet x 8 feet, silk dye on silk, 3/4 finished
It’s hard to get a good picture of something so large. In both of these pictures you can see that the perspective is foreshortened, so it is hard to see the whole thing properly. Even when the panels are hanging vertically on the wall where they belong it will be challenging to get a good photo. Guess you will just have to see it in person!
Upside down “Zion’s Waterfall, 36 feet by 8 feet, silk dye on silk, 3/4 finished.
See how different it looks upside down? The white area will be the very top of the painting. The piano is at the bottom of the piece.
In the next picture you see the very top of the piece, and I’ve selected some shots that take you down the whole length, so as you scroll down you can see some more of the detail. Remember that it’s not finished yet…this view of the whole has left me with a list of things to take care of.
Top of painting
The area in the picture below is where I will be doing the most touch-up work, as far as fixing things go. This area needs some simplification and unification. I have a plan (check back to see how I do this).
Below you can see that the rocks, and the waterfall below the rocks, are the least developed of the project, since I am working from the top down.
Can you see that the colors and textures are not as rich in the lower areas? It’s amazing what just one more layer of dye will do, to add variation and saturation. The rocks will be darker in value, maybe as dark as black, but I want to keep some of the color variation in these rock shapes.
Detail, Zion’s River
And the water in the lower waterfalls will be rich too, with more interesting lines and textures, sort of like what you see below.
I really like making good use of what the dyes can do. It’s a matter of knowing your materials very well, and what happens to them in different circumstances. I’ve used layered dyes to make interesting lines, painted with water to push the paint around, used a watercolor technique of transparency, and blended colors to make soft edges. I’ve used some gutta resist for sharp edges and keeping one section of dye from another, lots of salt, and lots of prayer.
And finally, here I am in my studio-to-be, with the silk on the frames.  Now that all the silk is covered at least once the major decisions are done and the great share of the work is over. Now comes the very most important part of the painting: Tuning it up to make it just right.
The more preparation a person does before a big project, the greater confidence one has in what might happen when the color hits the ground.
This project will be 36 feet by 8 feet, silk dye on silk, of a waterfall. The design is monochromatic, that is, mostly blues and very little else, so I will have to depend to a great degree on value (lightness and darkness) to carry the piece. I also ordered some new colors of dye, so I had plenty of nice rich blues to work with.
Since I ordered new blue dyes that I’ve never used before I wanted to see how they react with the dyes I already have, so I made a new color chart that includes the new dyes. Now I know what a color mixed with any other dye will look like. On the right you can see the watercolor pigments I used to make the watercolor sketch I am using for the silk painting. It is these colors I wanted to find equivalent dyes for.
Above is the watercolor sketch of the waterfall, turned on its side. Look carefully to see the gridding on the sketch. Each line represents one foot. The waterfall will be 36 feet long, in three pieces: one 4 feet wide, and two 2 feet wide. You can see the long pen lines marking where the sketch is divided into 3 parts, wider in the middle and narrow on each side. Hanging below the sketch is my chosen palette! The color scheme is simple, with blues from light to dark, and from greenish to more purple-ish. Then I added in the complement of blue, orange, in an earthy tone, both lighter and darker. And also a black to punch up the value, if needed.
Here above is the waterfall sketch, with a grid on tracing paper that I can lay over the sketch. It is carefully drawn to size, so I know how wide each panel will be, where the beam in the ceiling will intersect with the silk, and how high the 12′ slit in the bottom will be on the design. Why the slit? To pull back each side like curtains to reveal an immersion baptismal pool!
My husband made me these wonderful frames to stretch the silk on for painting. You can see two narrower 2′ wide frames and one 4′ frame in the center, with silk stretched on them. He made rollers on each end of the frames, so I can work on just 9 feet of the 36-foot length of silk at once. I marked each foot of each piece of silk, so I can paint them side by side, knowing I’m in the right area.
Also note my wonderful studio, which is being built on weekends. Soon there will be an arched window overlooking the bay, and an opening skylight. We put in a floor and a staircase to get to the attic last fall, insulated this spring, and this coming fall we will put up dry wall and paint the walls white. The distance from the floor to the peak is 11 feet! It’s a wonderful place to work.
Keep an eye on this blog. I’ll be taking you through this whole process as it progresses. Also see the previous entries to get the full story on this project!
 The wall behind and around this silk mural was painted a medium dark brown to echo some of the rock colors, and to help enhance their videos. Apparently darker colors are better than light ones for this.


